
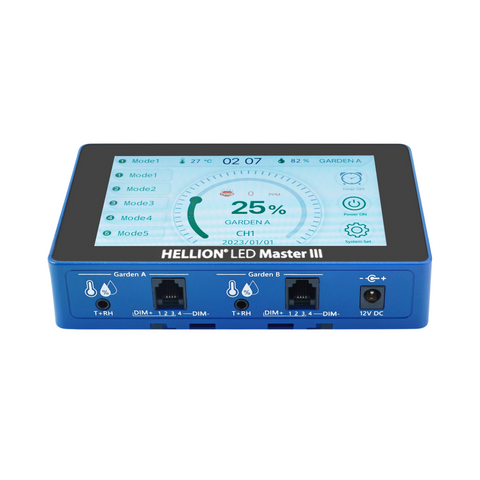


Hellion LED VS3 - 3 Channel Master Controller - Automated Variable Spectrum Control
Hellion LED grow light controller puts you in control of your garden's day, choose & set the spectrum, intensity & UV levels you want for your plants
- Automatically adjust, spectrum, intensity & UV independently and at multiple times per day
- Create your own custom user defined spectral mixes and grow schedules in 2 separate zones, from simple to complex, catering for your plant’s seasonal requirements
- Control your plants day precisely Sunrise - Cloudy - Sunset - High or Low UV with easy DIY setup. Alternatively, you can keep it simple with a basic lights on/lights off programme
- 5 memory modes to store & recall seasonal light recipes as required
- Individual 3 channel dimming control Veg, Bloom and UV channels with precise 0 - 100% control on each channel
- Temperature sensor included to monitor & protect against overheating in your grow area
- Optional Co2 measuring sensor can be purchased separately and added to the controller-system to monitor your grow area Co2 Levels
- Run up to 50 fixtures per zone with Garden A & Garden B options. You can program 2 x Separate zones if you have 2 separate growing environments or a requirement for 2 separate zones using the Garden A and Garden B outlet connections & settings. Ensure you connect the RJ11 data cable into the appropriate outlet socket on the Master controller.
- Plug & play using standard RJ11 data cables
- Unlimited fixtures can be added when used with the Hellion Easy Controller
Master Controller initial setup
- If this is your first time using the LED Master Controller, you will need to set the correct time
- We also recommend changing the default channel names from CH1, CH2, CH3 to Veg, Bloom, UV matching the channel names on your Hellion VS3 LED grow light
- Press the “System Set” in the bottom right hand corner of the Master Controller
- Under the “Channels Name Alter” section:
- Press CH1 and enter “Veg” for the channel name, followed by the TICK icon in the top right corner.
- Press CH2 and enter “Bloom” for the channel name, followed by the TICK icon in the top right corner.
- Press CH3 and enter “UV” for the channel name, followed by the TICK icon in the top right corner.
- Under the “Output Channel Select” section, make sure Channels 1, 2, and 3 are all set to ON.
- Finally, make sure that the displayed time is set to the current time and press the TICK icon in the top right corner.
Operating the Timer
- Press the “Timer Mode” icon
- Then press the “+” icon to enter new time + channel information
- After this set the time on the 24 hour clock using the up/down arrows. Set channel percentages using the sliding bars
- Press the “✓” icon to save your settings
- Press the “+” icon to enter more time + channel settings, or press “✓” to turn the timer on and complete the task
Note the “Timer On” icon must be showing and coloured green to be operational.
Please also ensure your Hellion LED grow light is switched to the EXT setting on the fixture for the controller to work