

LED Hellion 3 Channel Master Controller
LED Hellion 3 Channel Master Controller
The master controller puts you in control of your garden. A single controller can control one light up to 1000 lights.
User-defined spectral mixes and grow schedules in 2 separate zones
Controls separate VEG, BLOOM and UV / Dim each channel 0 - 100%
Unlimited fixtures when used with HELLION “Easy Controller”
Run up to 50 fixtures per zone (GARDEN A + GARDEN B)
Sunrise/cloudy/sunset DIY setup
Uses standard RJ11 data cables
Master controller hints + proposed Sunrise and Sunset settings for use in the “Timer mode”.
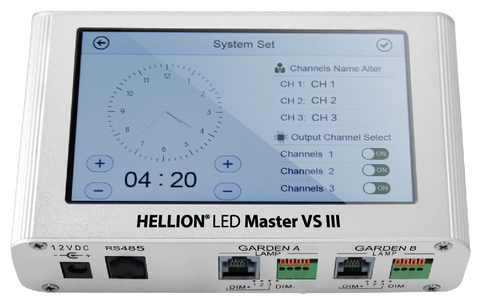
If this is your first time using the LED Master Controller, you will need to set the correct time.
We also recommend changing the default channel names (CH1, CH2, CH3) to match the channel names on the HELLION VS3 LED (Veg, Bloom, UV).
Press the “System Set” in the bottom righthand corner of the Master Controller.
- Under the “Channels Name Alter” section:
- Press CH1 and enter “Veg” for the channel name, followed by the TICK icon in the top right corner.
- Press CH2 and enter “Bloom” for the channel name, followed by the TICK icon in the top right corner.
- Press CH3 and enter “UV” for the channel name, followed by the TICK icon in the top right corner.
- Under the “Output Channel Select” section, make sure Channels 1, 2, and 3 are all set to ON.
- Finally, make sure that the displayed time is set to the current time and press the TICK icon in the top right corner.
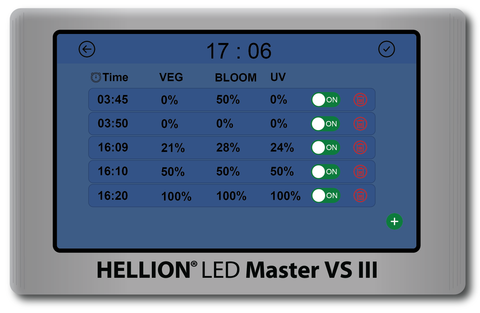
Operating the Timer.
1. Press the “Timer Mode” icon.
2. Press the “+” icon to enter new time + channel information.
3. Set time on the 24hr clock using the up/down arrows. Set channel percentages using the sliding bars.
4. Press the “✓” icon to save your settings.
5. Press the “+” icon to enter more time + channel settins, or press “✓” to turn the timer on and complete the task.
Note : the “Timer On” icon must be showing and coloured green to be operational.
Hint : Enter a few different time and channel settings, one minute apart, connect a Hellion LED and observe the changes as the timer controls them.
Run through that process a few times making sure all intended changes proceed as planned and you should become proficient in no time.
# You can program 2 x separate channels (Garden A and channel B) so be sure to connect the RJ11 cable (phone cable) into the appropriate jack when testing.
Sunrise / Sunset Examples (duration = 40 minutes for all).
Sunrise Spectrum (veg)
05:00 Veg 0% UV 0% Bloom 20%
05:10 Veg 20% UV 0% Bloom 20%
05:20 Veg 50% UV 0% Bloom 20%
05:30 Veg 80% UV 20% Bloom 10%
05:40 Veg 100% UV 40% Bloom 10%
Sunset Spectrum (veg)
22:20 Veg 80% UV 20% Bloom 10%
22:30 Veg 60% UV 0% Bloom 20%
22:40 Veg 40% UV 0% Bloom 20%
22:50 Veg 20% UV 0% Bloom 30%
23:00 Veg 0% UV 0% Bloom 0%
Sunrise Spectrum (transition)
05:00 Veg 0% UV 0% Bloom 30%
05:10 Veg 20% UV 0% Bloom 30%
05:20 Veg 50% UV 0% Bloom 30%
05:30 Veg 80% UV 20% Bloom 50%
05:40 Veg 100% UV 40% Bloom 50%
Sunset Spectrum (transition)
16:20 Veg 75% UV 20% Bloom 50%
16:30 Veg 50% UV 0% Bloom 50%
16:40 Veg 30% UV 0% Bloom 50%
16:50 Veg 20% UV 0% Bloom 40%
17:00 Veg 0% UV 0% Bloom 0%
Sunrise Spectrum (flowering)
05:00 Veg 0% UV 0% Bloom 40%
05:10 Veg 20% UV 0% Bloom 40%
05:20 Veg 40% UV 20% Bloom 60%
05:30 Veg 70% UV 40% Bloom 80%
05:40 Veg 100% UV 60% Bloom 100%
Sunset Spectrum (flowering)
16:20 Veg 75% UV 40% Bloom 100%
16:30 Veg 50% UV 20% Bloom 100%
16:40 Veg 25% UV 0% Bloom 80%
16:50 Veg 0% UV 0% Bloom 80%
17:00 Veg 0% UV 0% Bloom 0%